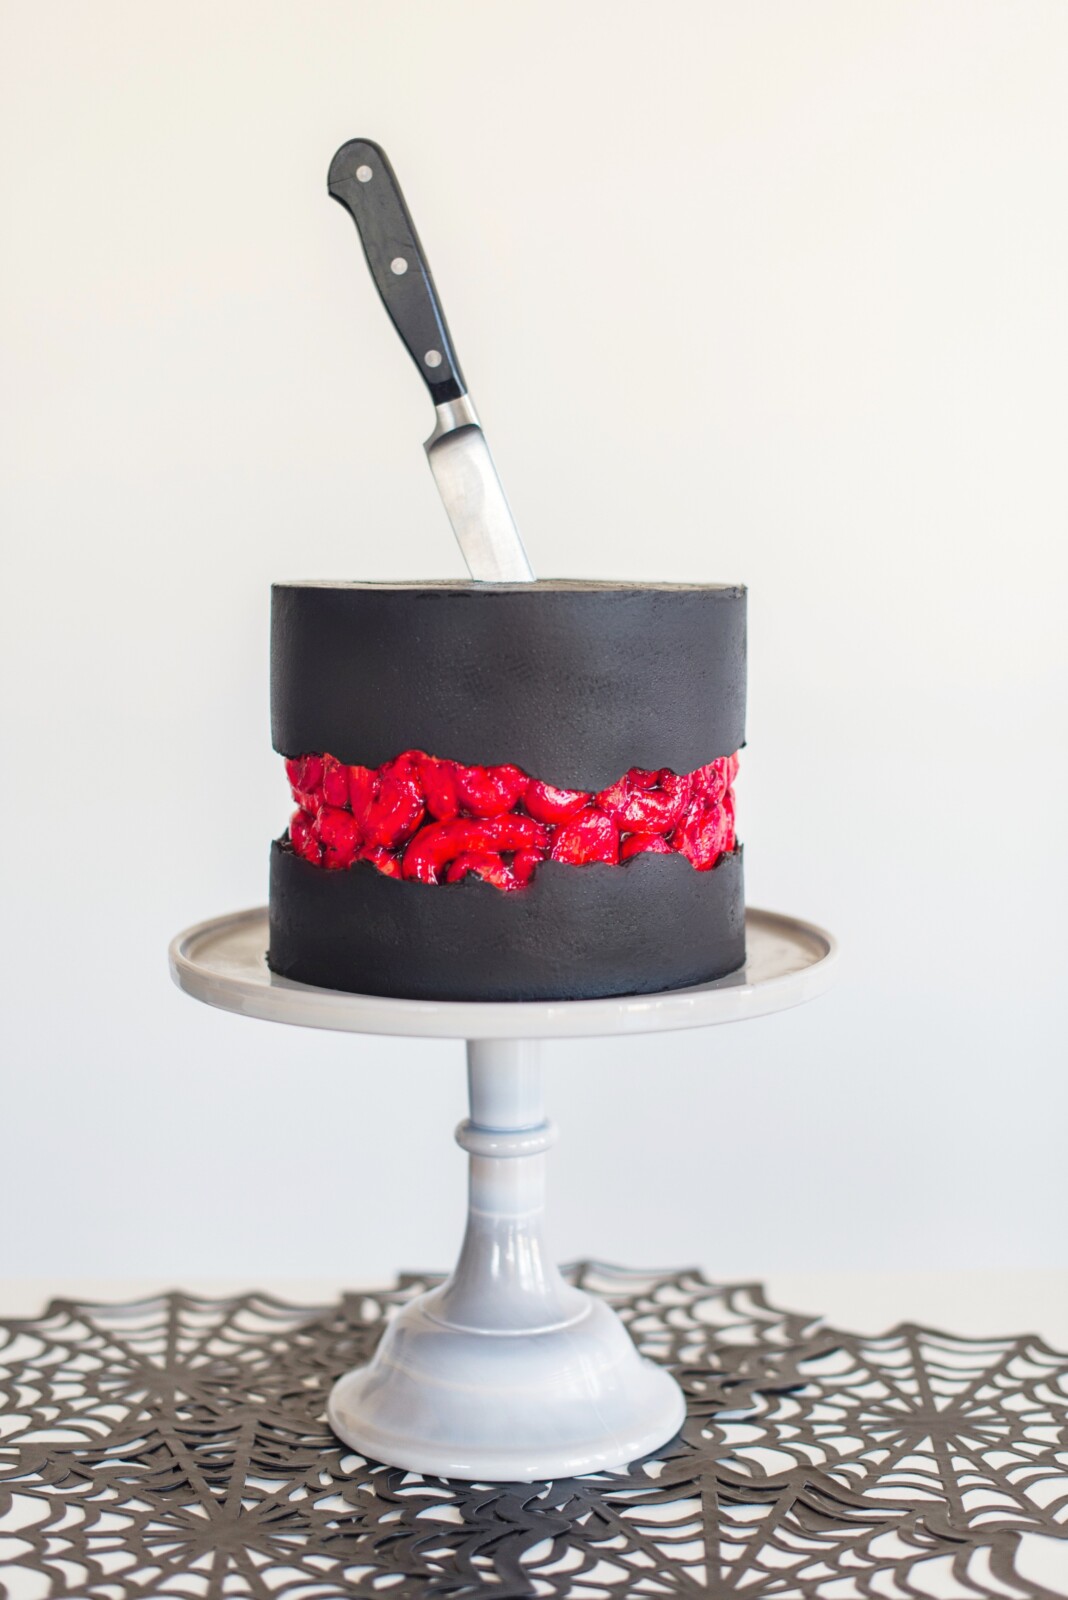
Okay friends — this one is not for the faint of heart! My Bloody Brain Cake recipe is easily one of the most dramatic (and surprisingly delicious) cakes I’ve ever made for Halloween.
It’s got all the Halloween fun you could want — rich red velvet cake layers, vanilla and black buttercream, and a glossy “bloody” glaze that makes the whole thing look just realistic enough to make your guests do a double take!
But don’t worry — it’s all cake. And it’s all delicious.

What You’ll Need for Halloween Brain Cake
Ingredients
For the Red Velvet Cake:
- 1/2 cup (113 g) unsalted butter at room temperature
- 3/4 cup (165 g) light brown sugar, packed
- 1 cup (200 g) granulated sugar
- 2 tbsp red velvet emulsion (I use LorAnn Oils Emulsions)
- 3 large eggs, at room temperature
- 2 1/4 cups (270 g) all-purpose flour
- 2 tbsp (14.75 g) cocoa powder
- 1 tsp (6 g) salt
- 1 1/2 cups (360 g) buttermilk, at room temperature
- 1/4 cup (60 g) sour cream, at room temperature
- 1 tbsp (14.37 g) vinegar
- 1 1/4 tsp (5 g) baking soda
For the Vanilla Buttercream:
- 2 cups (452 g) unsalted butter, chilled (I take the butter out of the fridge 30 minutes before I make my frosting)
- 6 cups (750 g) powdered sugar, measured and then sifted
- 1/4 cup (57.75 g) heavy whipping cream
- 2 teaspoons (8.4 g) pure vanilla extract
- Pinch of salt
*This buttercream recipe makes enough to fill and cover your cake. If you want to add additional piping, you’ll want to make an extra 1/2 batch.
For the Black Buttercream:
- 1 cup (226 g) unsalted butter, slightly chilled
- 2½ cups (312 g) powdered sugar, measured and then sifted
- ½ cup (59 g) good-quality black cocoa powder
- 6 tablespoons (88.75 g) hot water (that’s ¼ cup + 2 tablespoons)
- ¾ teaspoon (3 g) pure vanilla extract
- Small pinch of salt
- 4 ounces (75 g) premium dark chocolate, chopped or chips, melted
- ½–1 teaspoon (1.5–3 g) food gel in Super Black
Equipment
How to Make a Halloween Bloody Brain Cake Step by Step
Now that you have the ingredients and equipment ready, I’ll teach you how to make a brain cake that’ll look equally parts tasty and horrifying:
Step 1: Stack and Crumb Coat the Cake
Evenly spread about ⅔ cup of vanilla buttercream between each of the 6-inch cake layers. Place the last cake layer top side down.
Apply a thin layer of the vanilla buttercream over the entire cake.
Freeze the cake for 15 minutes.
Step 2: Pipe the Brain Design
Using your piping bag, swirl frosting on the center 2-3 inches of your cake to create a brain shape.
Complement your kitchen with my baking tools ⤵
Freeze the cake for another 15 minutes.
Using another piping bag filled with the black buttercream, piping frosting at the top and bottom of the cake, overlapping the piped brain area just a bit.
Use a cake scraper to smooth the black buttercream. Don’t worry about rigid edges. That’s what you want!
Once the black buttercream is smooth, freeze the cake again for about 15 minutes.
Step 3: Paint on the “Blood”
Finish the cake by combining the food gel with the food coloring and painting it on the white buttercream brain area.
→ Get the full detailed recipe instructions here.
Tips for Success
To make this brain cake idea a centerpiece of your Halloween celebration, keep in mind these tips:
- Chill between steps! The buttercream details will hold their shape better if the cake is cold.
- Use gel food color for the blood glaze WITH the store-bought gel. You don’t need to add too much of the food coloring to the store-bought gel, just a drop or two to enhance the color.
- Make ahead: The cake layers can be baked and frozen up to a week in advance. Assemble and decorate the day before your party.
For more dramatic yet delectable cakes for spooky season, check out more of my Halloween cake ideas.
For the Red Velvet Cake
- ½ cup (113 g) unsalted butter room temperature
- ¾ cup (165 g) light brown sugar packed
- 1 cup (200 g) granulated sugar
- 2 tbsp red velvet emulsion (I use LorAnn Oils Emulsions)
- 3 large eggs room temperature
- 2 ¼ cups (270 g) all-purpose flour
- 2 tbsp (14.75 g) cocoa powder
- 1 tsp (6 g) salt
- 1 ½ cups (360 g) buttermilk room temperature
- ¼ cup (60 g) sour cream room temperature
- 1 tbsp (14.37 g) vinegar
- 1 ¼ tsp (5 g) baking soda
For the Vanilla Buttercream
- 2 cups (452 g) unsalted butter chilled (I take the butter out of the fridge 30 minutes before I make my frosting)
- 6 cups (750 g) powdered sugar measured and then sifted
- 2 teaspoons (8.4 g) pure vanilla extract
- 1 pinch salt
For the Black Buttercream
- 1 cup (226 g) unsalted butter slightly chilled
- 2 ½ cups (312 g) powdered sugar measured and then sifted
- ½ cup (59 g) good-quality black cocoa powder
- 6 tablespoons (88.75 g) hot water (that’s ¼ cup + 2 tablespoons)
- ¾ teaspoon (3 g) pure vanilla extract
- 1 small pinch salt
- 4 ounces (75 g) premium dark chocolate, chopped or chips melted
- ½-1 teaspoon (1.5-3 g) food gel in Super Black
For the Cake
-
Preheat the oven to 325 degrees F. Spray the bottom and sides of four 6-inch or three 8-inch round cake pans with nonstick spray, line the bottom with parchment paper, and spray again with the nonstick spray. Set aside.
-
In a stand mixer fitted with the paddle attachment, combine the butter, granulated sugar, brown sugar, and red velvet flavor. Beat the ingredients on medium-high speed for about 5 minutes, until the mixture is light in color and slightly increased in volume.
-
Lower the speed and add the eggs, one at a time, mixing until each egg is incorporated before adding the next. Continue to beat on medium-high until smooth and nearly double in volume.
-
In a separate bowl, whisk together the flour and cocoa powder. Sprinkle the salt on top of the dry ingredients and whisk until combined.
-
With the stand mixer on low speed, alternately add the dry ingredients and the buttermilk into the butter mixture, beginning and ending with dry ingredients. Mix until just incorporated. Fold in the sour cream.
-
In a small bowl, combine the vinegar and baking soda until it fizzes and then add to the batter. Stir until blended.
-
Divide the batter evenly between the prepared pans (about 16 oz. of batter in each 8-inch or 12oz in each 6-inch).
-
Bake for 25 to 30 minutes, or until a toothpick inserted in the center of the cake comes out with a few moist crumbs on it.
-
Let pans cool on wire rack for about 10-15 minutes before inverting the cakes onto racks. Let cool completely.
-
Level cakes if needed. Chill the cakes for at least an hour before using. Can be stored the freezer for up to one month wrapped well in plastic wrap and foil.
For the Vanilla Buttercream
-
In the bowl of a stand mixer fitted with a paddle attachment, cream the butter for about 2 minutes. This will soften the butter without it having to be warm.
-
With the mixer on low speed, gradually add the sifted powdered sugar, one cup at a time, mixing a little in between each addition.
-
With mixer on medium speed, add whipping cream, vanilla and salt.
-
Turn the mixer to medium-high speed and beat for an additional 5 to 7 minutes. The frosting will become lighter in color and texture.
-
Before spreading on your cake, spend a couple minutes mixing the buttercream by hand with a wooden spoon to push out the air pockets.
For the Black Buttercream
-
In a bowl of stand mixer fitted with paddle attachment, beat the butter on medium-high speed until light and fluffy, about two minutes.
-
In a small mixing bowl, combine the hot water and cocoa powder. The mixture will be thick like a paste. Set aside.
-
In a microwave safe bowl, heat the chocolate chips until melted and smooth. Let cool slightly, but not all the way to room temperature.
-
Reduce the mixer’s speed to medium and slowly stream in the melted chocolate, making sure to scrape down the sides of the bowl occasionally so the chocolate doesn’t harden around the sides of the bowl.
-
Add the cocoa paste (cocoa and water mixture), followed by the vanilla and salt. Beat until incorporated, about 1 minute.
-
Decrease the speed to low and gradually add the powdered sugar. Once the powdered sugar is incorporated, add the black food gel and then beat for about two minutes. The color will likely be grey. Don’t worry. Your next job is to be patient!
-
Let the frosting sit for at least a couple of hours (even a full day is great) because the color will take awhile to process and it’s best to let it sit rather than adding more and more coloring right away.
-
If you’ve let the frosting rest for plenty of time and it’s still not black, add one more teaspoon of black food gel and let it rest a bit more.
-
If your frosting is too soft, cover it with plastic wrap and let it chill in the refrigerator a bit.
#Red #Velvet #Bloody #Brain #Cake #Halloween #Fun