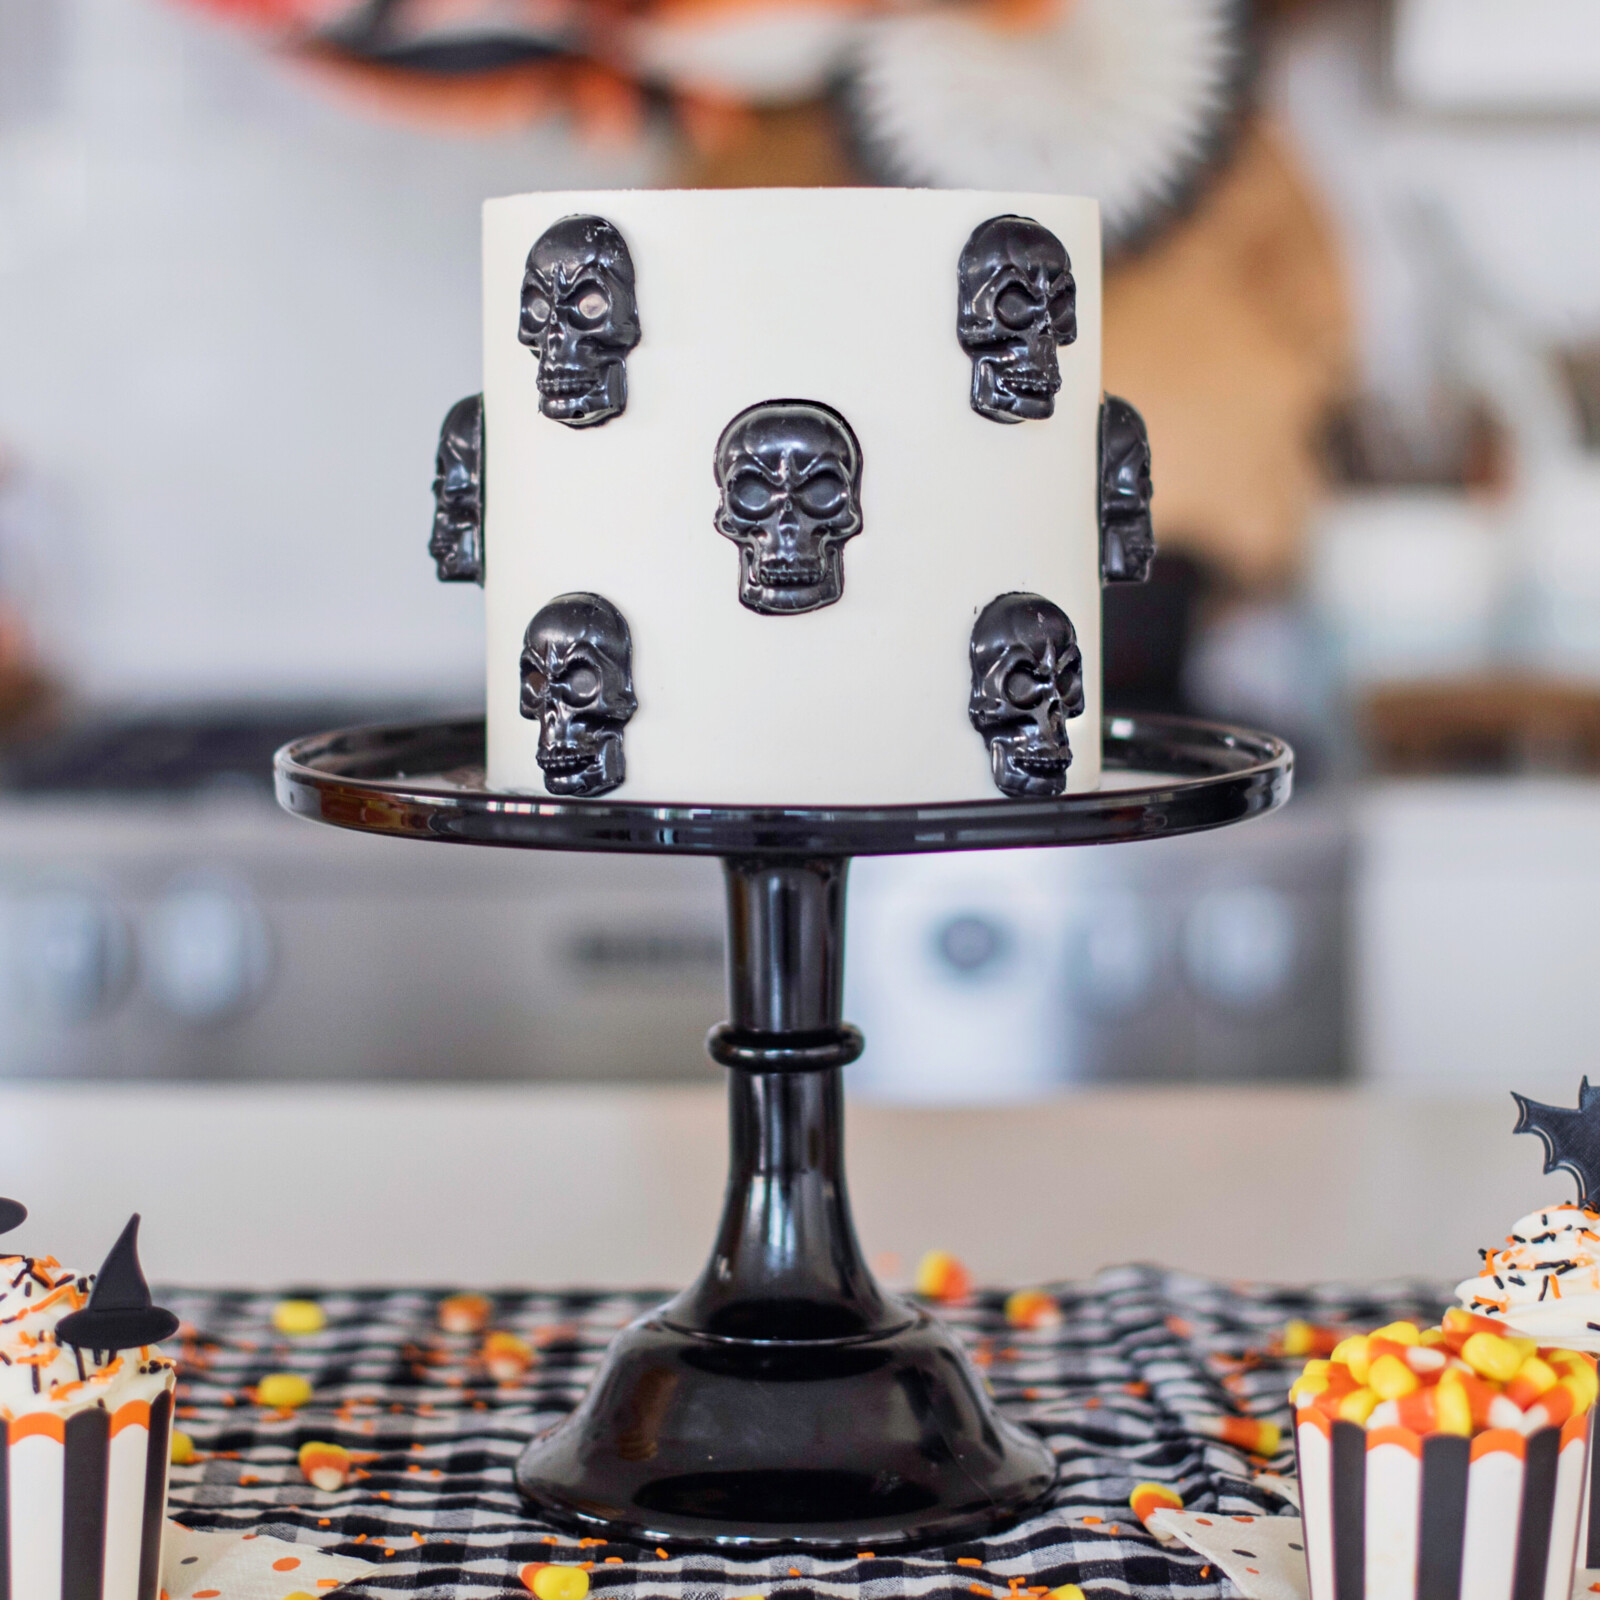
Sometimes the most dramatic cakes are surprisingly simple. My Skull Cake combines clean design and haunting visuals with ease and approachability.
The black chocolate skulls add that spooky “wow” factor, but you don’t need to be a master decorator to pull this off. I use chocolate molds, melted candy, and buttercream to bring it all together — no sculpting skills needed.
This is one of my favorite Halloween designs when I want a cake that’s bold, memorable, and still fun to make.

What You’ll Need for the Halloween Skull Cake
I love this skull cake idea because it’s straightforward with the ingredients and steps, making it perfect for baking with friends and family. Here’s what you’re going to need…
Ingredients
For the Chocolate Cake:
- 2 cups (240 g) all-purpose flour
- 1 3/4 cups (350 g)granulated sugar
- 3/4 cup (88.5 g) Cacao Barry Extra Brute Cocoa Powder or similar premium brand
- 2 teaspoons (8 g) baking soda
- 3/4 teaspoon (3 g) baking powder
- 1 teaspoon (6 g) salt
- 3 eggs, room temperature
- 1 cup (240 g) buttermilk, room temperature
- 1 cup (236.6 g) hot water or coffee
- 1/2 cup (109 g) vegetable oil
- 1 teaspoon (4.2 g) pure vanilla extract
For the Buttercream:
- 2 cups (452 g) unsalted butter, chilled (I take the butter out of the fridge 30 minutes before I make my frosting)
- 6 cups (750 g) powdered sugar, measured and then sifted
- 1/4 cup (57.75 g) heavy whipping cream
- 2 teaspoons (8.4 g) pure vanilla extract
- Pinch of salt
For the Skull Molds:
Equipment
- Stand mixer with paddle attachment
- Round cake pans (Three 8-inch OR four 6-inch pans needed)
- Kitchen scale
- Parchment paper rounds
- Wire cooling racks
- Cake board
- Offset spatula
- Acrylic cake disks
How to Make the Skull Cake
Let’s get stuck in and prepare everything for this bone-trembling design!
1. Make the Chocolate Black Skulls
Melt your black candy melts or dark chocolate in the microwave (in short bursts, stirring often) until fully smooth.
Fill your skull molds with the melted chocolate, tapping them gently to release air bubbles.
Let them set until firm (you can refrigerate to speed it up).
Once set, pop them out carefully.
Complement your kitchen with my baking tools ⤵
2. Bake & Chill Your Cake Layers
Prepare your cake layers as usual. Chill them before assembly so the buttercream sticks cleanly and the skulls don’t fall.
3. Stack & Frost the Cake
Stack your layers with a layer of buttercream in between.
Apply a crumb coat and chill for 10–15 minutes to lock in crumbs.
4. Attach the skulls
Use a dab of buttercream as “glue” to press the skull chocolates around the cake’s sides.
Position them evenly or in clusters — whatever spooky pattern you like.
→ Get the full detailed recipe instructions here.
Tips for Success with Skull Cake Decorations
- Use candy molds: It simplifies the skull shape so that you don’t need to sculpt anything.
- Use black candy melts or very dark chocolate: For crisp, bold skulls that contrast well.
- Let the chocolate set fully: Don’t rush taking skulls out of the molds — cracked ones break the effect.
Great for Halloween & Gothic Birthdays
While the skull cake makes for an excellent spooky Halloween treat, it also works well as a gothic skull cake idea for birthdays and parties where the theme screams for it!
Use this recipe and make it your own, delighting the beloved goth in your life. And for even more gothic, spooky, and Halloween ideas, you can try take a look at these easy Halloween recipe ideas.
For the Chocolate Cake
- 2 cups all-purpose flour
- 1 ¾ cups (350 g) granulated sugar
- ¾ cup (88.5 g) Cacao Barry Extra Brute Cocoa Powder or similar premium brand
- 2 teaspoons (8 g) baking soda
- ¾ teaspoon (3 g) baking powder
- 1 teaspoon (6 g) salt
- 3 eggs room temperature
- 1 cup (240 g) buttermilk room temperature
- 1 cup (236.6 g) hot water or coffee
- ½ cup (109 g) vegetable oil
- 1 teaspoon (4.2 g) pure vanilla extract
For the Buttercream
- 2 cups (452 g) unsalted butter chilled (I take the butter out of the fridge 30 minutes before I make my frosting)
- 6 cups (750 g) powdered sugar measured and then sifted
- ¼ cup (57.75 g) heavy whipping cream
- 2 teaspoons (8.4 g) pure vanilla extract
- 1 pinch salt
For the Cake
-
Preheat the oven to 325 degrees F. Prepare three 8-inch or four 6-inch round cake pans by spraying the bottom and sides with nonstick spray, lining the bottom with parchment paper, and spraying the parchment paper.
-
In a bowl of electric mixer, combine all the dry ingredients.
-
Combine eggs, buttermilk, water, oil and vanilla in a measuring cup and lightly beat with a fork.
-
Add wet ingredients to the dry ingredients, and mix on low speed until combined. Batter will be thin. Scrape sides and mix for another 30 seconds. Divide batter evenly among prepared pans (I like to use a kitchen scale to ensure the batter is evenly distributed – about 15 to 16 ounces in each 8-inch or 12 ounces in each 6-inch).
-
Bake for 23 top 27 minutes (you may need more time depending on your oven), until toothpick comes out with just a few moist crumbs on it. Cool on wire racks for 10-15 minutes, then gently invert onto racks until cooled completely.
-
When cakes are completely cooled, I like to wrap each cake layer individually with plastic wrap and stick it in the refrigerator or freezer until I’m ready to frost. The cake will be easier to work with if it’s cooled a bit. If I’m making the cake a day or two before I actually need to frost it, I put it in the freezer to ensure freshness. If I’m frosting same-day, I’ll just put it in the refrigerator to chill until needed.
For the Buttercream
-
In the bowl of a stand mixer fitted with a paddle attachment, cream the butter for about 2 minutes. This will soften the butter without it having to be warm.
-
With the mixer on low speed, gradually add the sifted powdered sugar, one cup at a time, mixing a little in between each addition.
-
With mixer on medium speed, add whipping cream, vanilla and salt.
-
Turn the mixer to medium-high speed and beat for an additional 5 to 7 minutes. The frosting will become lighter in color and texture.
-
Before spreading on your cake, spend a couple minutes mixing the buttercream by hand with a wooden spoon to push out the air pockets.
Assembly
-
Place the first cake layer, top side up and spread about 3/4 cup of frosting on top. Make sure to get eye level with the cake to ensure the frosting is spread evenly over the cake.
-
Repeat this step until you get to the final cake layer, which you will lay top side down.
-
Apply a thin coat of frosting around the entire cake to lock in the crumbs. Freeze for about 10 minutes.
-
After the crumb coat is set, continue frosting the cake with the remaining buttercream.
-
Apply a small dollop of buttercream to attach each skull to the cake.
*This buttercream recipe makes enough to fill and cover your cake. If you want to add additional piping, you’ll want to make an extra 1/2 batch.
#Skull #Cake #Easy #Gothic #Halloween #Cake #Idea